 ultimate-guide
How to Choose Foundation for Skin: A 2026 Guide
Table of Contents
- Why Most Foundation Matches Fail (And How to Fix Yours)
- How to Determine Skin Undertone Before You Swatch
- Match Foundation to Your Skin Type: Oily vs Dry
- Pick the Right Formula and Finish for Your Needs
- How to Test Foundation Shade Like a Pro
- Account for Oxidation and Seasonal Skin Changes
- Common Foundation Mistakes to Avoid
- Conclusion: Your Foundation Shopping Checklist
- Frequently Asked Questions
Last Updated: September 9, 2026
Why Most Foundation Matches Fail (And How to Fix Yours)
The struggle to figure out how to choose foundation for skin is rarely about lack of effort; it is almost always about testing in the wrong light and against the wrong part of the face. To choose foundation wisely, you must first understand where most people go wrong. Most people swatch on their hand or wrist, but the color there rarely matches your face and neck.
The fix starts with understanding that your face has two distinct tones: the surface tone you see and the undertone beneath it. Choosing a foundation that matches both is the difference between makeup that looks like skin and makeup that looks like a mask. The fix starts with understanding that your face has two distinct tones: the surface tone you see and the undertone beneath it. Choosing a foundation that matches both is the difference between makeup that looks like skin and makeup that looks like a mask.
How to Determine Skin Undertone Before You Swatch
Skin undertone is the subtle hue beneath your skin's surface that remains constant regardless of tanning or seasonal changes. It falls into three categories: cool, warm, and neutral. Cool undertones have hints of pink or blue, warm undertones show yellow or golden hues, and neutral undertones are a balance of both (the American Academy of Dermatology).
The quickest way to find yours is the vein test. In natural light, look at the veins on the inside of your wrist. If they appear blue or purple, you likely have a cool undertone. If they look green, you are probably warm-toned. If you cannot tell, you are likely neutral. Another reliable method is the white paper test: hold a plain white sheet next to your bare face.
A common mistake is confusing surface redness from breakouts or sensitivity with a cool undertone. Redness is not the same as undertone. If you have flushed cheeks but a golden glow elsewhere, your undertone is still warm. Choosing a foundation with a pink base to cancel redness often leaves a gray cast on warm skin.
Match Foundation to Your Skin Type: Oily vs Dry
Your skin type determines the formula that will stay put, while your undertone determines the shade. Many people struggle with the best foundation for oily vs dry skin because they buy based on coverage claims rather than their skin's actual behavior.
For oily skin, look for oil-free, non-comedogenic formulas labeled matte or shine-free (the FDA). These contain ingredients that absorb excess sebum and resist breaking down through the day. Avoid anything labeled dewy or luminous, as these add moisture and can slide off within hours.
Dry skin needs the opposite approach. Hydrating liquid and cream foundations with glycerin or hyaluronic acid provide the moisture your skin lacks. A dewy or satin finish adds a healthy glow, while matte formulas can cling to dry patches and emphasize texture.
For combination skin, the answer is not one product but two. Apply a matte foundation to the oily T-zone and a hydrating formula to the cheeks, then blend where they meet. This targeted approach beats any single universal product.
Pick the Right Formula and Finish for Your Needs
Coverage and finish are separate decisions from shade and skin type. Coverage describes how much of your natural skin shows through, ranging from sheer to buildable coverage to full. Finish describes the surface look: matte, dewy, satin, or luminous. But the formula's base chemistry, not just its label, determines how it behaves on your skin.
The Silicone vs. Water-Based Rule
The single most overlooked factor in foundation failure is the interaction between your foundation's base and your primer's base. Foundations and primers are either water-based or silicone-based, and mixing them is the leading cause of pilling, separation, and patchy wear.
Silicone-based products use volatile silicones (often ending in "-cone," like dimethicone) as their primary carrier, creating a smooth, slippery film that fills pores. Water-based products use water as the first ingredient, with humectants like glycerin or hyaluronic acid. When you apply a water-based foundation over a silicone-based primer, the water cannot penetrate the silicone film; it beads up and rolls off, taking your foundation with it.
The fix is simple: check the first three ingredients on both bottles. If one lists a silicone first and the other lists water first, they are not compatible. Match silicone to silicone and water to water. If you are unsure, a silicone-based primer with a silicone-based foundation is the safer bet for oily skin, while water-based pairings work well for dry or sensitive skin.
Formula Types: What the Labels Actually Mean
Liquid foundations are the most versatile and dominate the market. They range from watery, skin-like tints to high-pigment, full-coverage formulas. The key differentiator is the pigment-to-carrier ratio: higher pigment means more coverage but also more room for shade error.
Cream foundations sit in a compact or jar and have a thicker, more emollient texture. They offer medium to full coverage and are excellent for dry or mature skin because they often contain oils and waxes that provide moisture and a dewy finish.
Powder foundations are pressed or loose pigments that provide sheer to medium coverage. They are the fastest option for oily skin because they absorb sebum on contact and require no blending tools. However, they offer little hydration and can look cakey on dry patches.
Stick foundations are highly pigmented, full-coverage formulas in a twist-up tube. They are convenient for touch-ups and travel, but their high pigment load means a mismatched shade is immediately obvious.
The Finish Decision, Refined
Finish is a functional choice tied to your skin's oil and moisture levels. A matte finish contains oil-absorbing powders like silica or kaolin clay that soak up sebum throughout the day, which is why matte formulas last longer on oily skin.
A dewy finish relies on emollients and light-reflecting particles to create a luminous look. These formulas are hydrating but can slide off oily skin within hours. A satin finish is the engineered middle ground: it uses a balanced ratio of powders and emollients to provide a natural, skin-like texture.
Why Blendability Matters More Than Shade
A foundation that does not blend seamlessly will look patchy regardless of how perfect the color is. Blendability is determined by the formula's viscosity and pigment quality: finely milled pigments disperse evenly and melt into the skin, while coarser pigments sit on top and look streaky. You cannot tell this from a swatch alone; you need to work the product into your skin.
How to Test Foundation Shade Like a Pro
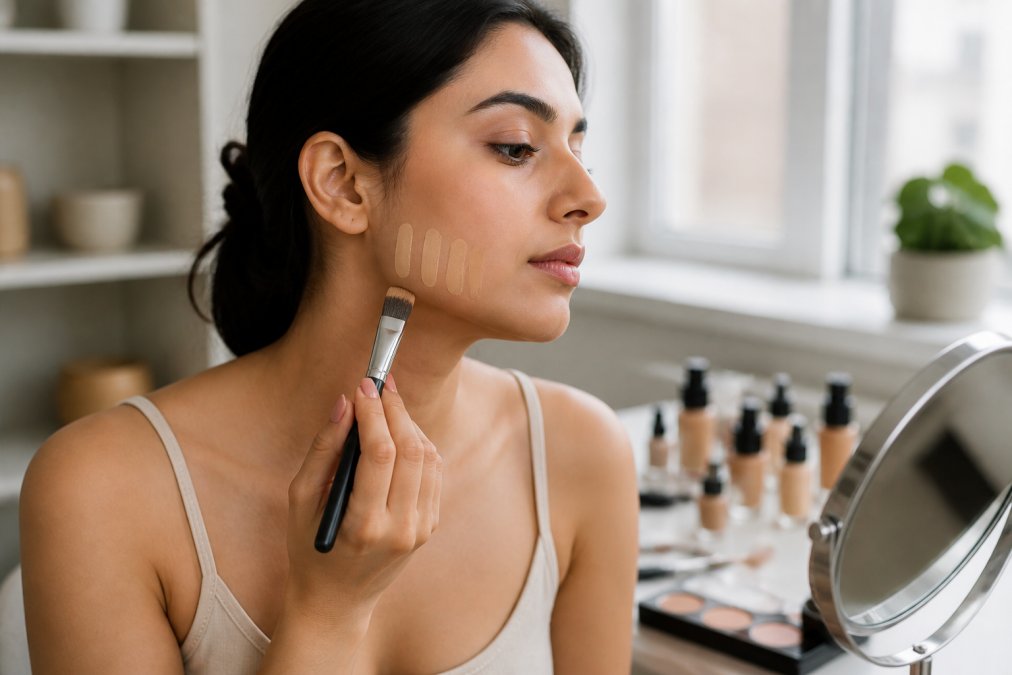
The jawline test is the only method that works. Apply three candidate shades in thin, vertical stripes along your jawline, extending slightly onto your neck. The correct shade disappears into both your face and neck without a visible line. This is the definitive way to test foundation shade because it bridges the two areas where mismatches are most visible.
The Oxidation Window: Why Two Minutes Is Not Enough
Most guides tell you to wait two minutes before judging a swatch. That is a starting point, not a finish line. Oxidation, the chemical reaction between the foundation's pigments and the oxygen and oils on your skin, continues for 10 to 15 minutes after application (peer-reviewed research).
Apply your three swatches, then wait a full 10 minutes before making a judgment. Do not touch the swatches during that time; your skin's natural oils will interact with the formula, and you need to see the final, settled color. Returning after 10 minutes gives you the true color, not the wet-applied illusion.
A shade that looks perfect wet but turns orange or ashy after 10 minutes is oxidizing. This is more common in formulas with iron oxide pigments, which react with the slightly acidic pH of your skin. If you consistently see oxidation with a formula, that product is not for you.
Lighting: The Difference Between a Match and a Mistake
Store lighting is designed to make products look appealing, not accurate. Most drugstores and department stores use overhead fluorescent or warm LED lighting that skews colors. Fluorescent lights add a green tint, making warm-toned foundations look more neutral; warm LED bulbs add a yellow cast, making cool-toned foundations look more pink.
Check your swatch in at least two lighting conditions before buying. First, find a window in the store and look at the swatch in natural daylight; if no window is available, step outside the store entrance. Second, check the swatch under the store's lighting to see how it will look indoors.
Virtual Try-On Tools vs. In-Store Testing: An Honest Comparison
Virtual try-on tools from major beauty retailers have improved significantly, but they cannot replicate your skin's texture, oiliness, or oxidation behavior. These tools use augmented reality to map the foundation color onto a digital rendering of your face. They are excellent for narrowing down which shades are worth testing in person, but not reliable for a final decision.
Virtual try-ons assume a uniform surface tone and cannot account for how your skin's natural oils will interact with the formula over time. They also cannot show how the foundation will look on your neck, which is often a different shade than your face.
In-store testing remains the gold standard because it allows you to feel the texture, observe the oxidation window, and check the match against your neck. Its limitation is that store lighting is unreliable and you cannot wear the product for a full day. The best approach is a hybrid: use virtual try-on tools to shortlist shades, then test those specific shades in store using the jawline method and the 10-minute oxidation wait.
The Cheekbone Test: A Secondary Check
Another pro technique is to test on the side of your face, not the center. The center often has more redness or pigmentation, which skews your perception of the shade. The cheekbone area near your ear gives a more accurate read of your overall complexion. Apply a thin stripe there as a secondary check after your jawline test.
Account for Oxidation and Seasonal Skin Changes
Oxidation is the chemical reaction when foundation interacts with the air and your skin's natural oils, causing the color to deepen over time. This is why a foundation can look perfect at 8 a.m. and too dark by noon. To combat this, choose a shade one step lighter than your perfect match if you tend toward oily skin.
Your skin tone also shifts with the seasons. Many people are a shade or two lighter in winter and darker in summer, even without obvious tanning. Rather than forcing one bottle to work year-round, keep two shades on hand, or mix a lighter and darker foundation to match your current tone.
Surface tone changes with sun exposure, but your undertone does not. This is why the undertone work you did earlier pays off: you can adjust the depth of your foundation seasonally while keeping the same undertone base. If your foundation consistently looks gray or muddy, it is usually an undertone mismatch, not a depth problem.
Common Foundation Mistakes to Avoid
The most expensive mistake is testing on your wrist or hand. These areas have different pigmentation than your face, and the skin texture is entirely different. Another frequent error is applying foundation to a bare, unmoisturized face. Without moisturizer and primer, it can cling to dry patches or slide off oily areas.
A third mistake is ignoring the interaction between your foundation and your other products. A water-based foundation over a silicone-based primer will pill and separate. Check the first ingredient of both: if one lists a silicone (often ending in "-cone") and the other lists water first, they may not be compatible.
Finally, stop buying the same shade year after year without checking it. Formulas are updated, ingredients change, and your skin changes with age, hormones, and climate. Re-test your foundation shade at least once a year, ideally in the change of season.
Conclusion: Your Foundation Shopping Checklist
Finding the right foundation is a process of elimination, not a lucky guess. You need to know your undertone, your skin type, and the coverage and finish you want before you ever pick up a bottle.
Use this checklist on your next purchase:
- Identify your undertone using the vein test in natural light
- Determine your skin type and choose a compatible formula
- Select a finish that matches your skin's needs
- Swatch three shades along your jawline
- Wait two minutes to check for oxidation
- Verify your base products are compatible with your primer and moisturizer
Shopping online removes the ability to swatch in person, which is why Radiant Essence Beauty focuses on detailed product descriptions and a customer-service-oriented approach. Our years of industry experience mean we can help you narrow down formulas based on your skin type and concerns before you buy. Get started with Radiant Essence Beauty and find a foundation that actually matches.
Frequently Asked Questions
Should foundation be lighter or darker than your skin?
Your foundation should match your skin's surface tone exactly, not be lighter or darker. A shade that is too light leaves a noticeable mask-like line, while a darker shade can make your face look muddy or unaturally tanned. The goal is for the foundation to disappear into your skin. Test shades along your jawline and check the match in natural lighting to confirm it blends seamlessly with both your face and neck.
How do I know my skin type for foundation selection?
Wash your face with a gentle cleanser, pat it dry, and wait about an hour without applying any products. If your skin feels tight and looks dull, you likely have dry skin. If your T-zone (forehead, nose, and chin) looks shiny but your cheeks feel normal, you have combination skin. If your entire face appears shiny and feels slick to the touch, you have oily skin. This simple test helps you choose the right foundation formula.
What is the difference between liquid, powder, and cream foundation?
Liquid foundation offers the widest range of finishes, from dewy to matte, and provides buildable coverage from sheer to full. Powder foundation is ideal for oily skin because it absorbs excess oil and provides a shine-free, matte finish, but it can look cakey on dry skin. Cream foundation delivers medium to full coverage with a blendable, satin finish and works well for dry or mature skin because it often contains hydrating ingredients like glycerin.
How can I test foundation shades without a store visit?
Use virtual try-on tools offered by many beauty brands to get a general sense of your shade range. For a more precise match at home, take a well-lit photo of your jawline and use a photo editing app to sample colors. The most accurate method is to order sample sizes or travel minis of two to three close shades. Apply them side by side on your jawline and observe the match in natural light over a few hours to see how the formula oxidizes.